Easy baked butternut squash fries are a delicious and nutritious alternative to french fries. The shape and texture are ideal for baby led weaning, but they're also great for toddlers and kids of all ages! Includes oven and air fryer instructions.

This post has been written and medically reviewed by Kaleigh McMordie, MCN, RDN (Registered Dietitian Nutritionist).
Baked Butternut Squash Fries
We grew butternut squash this year, and so have found ourselves overrun with the slightly sweet, nutrient dense winter squash. One way I've been using them is by making baked butternut squash fries for my kids. Sticks of butternut squash roast into savory bites with just a hint of sweetness and perfectly caramelized edges that are hard to stop sneaking right from the pan. The kids love them paired with a hamburger or chicken for lunch, and I love that they are much more nutritious than french fries, boasting vitamins A, C, and B vitamins, as well as potassium, magnesium, antioxidants and fiber.
Butternut squash fries are perfect for little hands, including baby led weaning babies. They are perfect for scooping up by tiny 6 month old fists, and are a great texture for BLW. But toddlers and older kids will also delight in a vegetable baked into something that resembles a french fry (just like my baked carrot fries!).
Jump to:
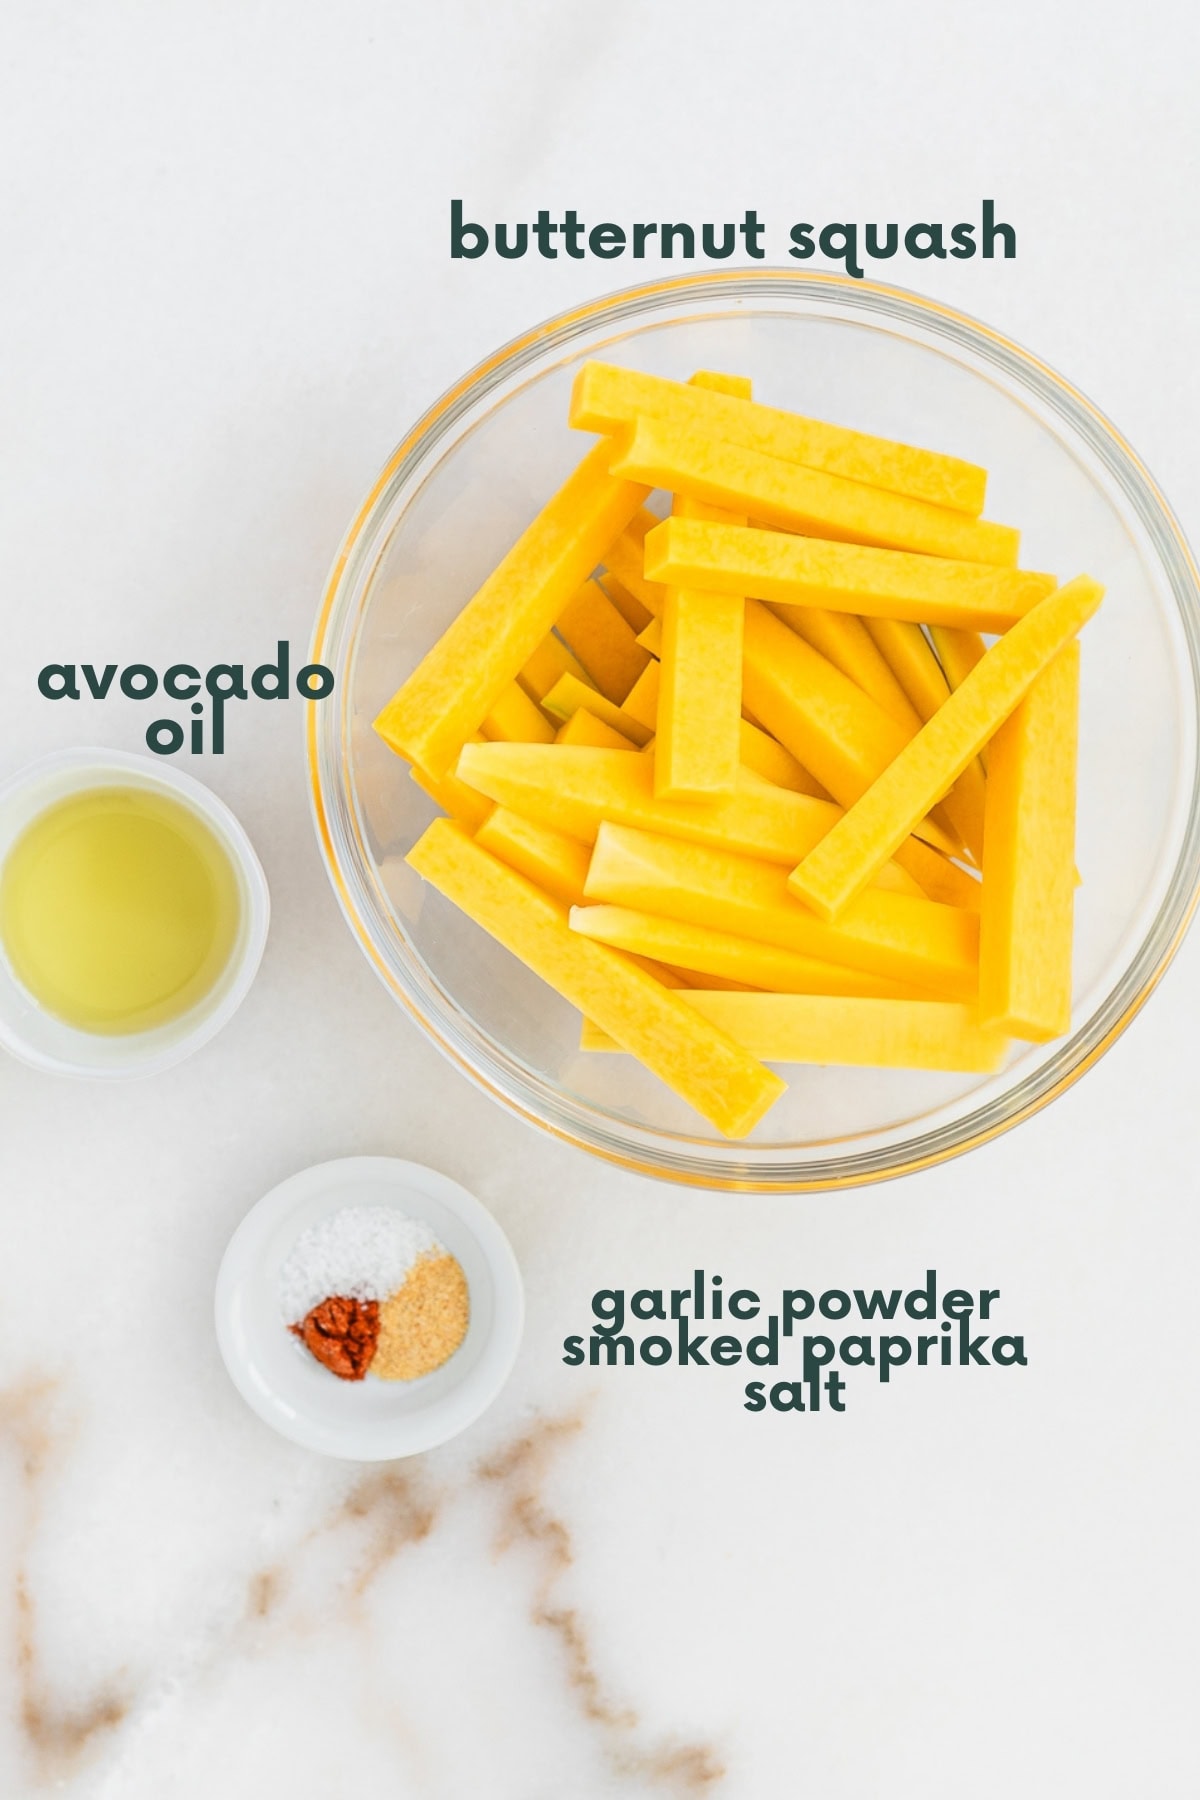
Ingredients
- Butternut squash - you'll need about a 1 pound squash, or a small one.
- Neutral oil, such as avocado oil (or you can use olive oil)
- Spices: garlic powder, smoked paprika (or regular paprika), and salt. The salt is optional if you're serving to babies, but it's a nice flavor enhancer for older kiddos.
Helpful Equipment
- A sharp knife is essential for peeling butternut squash and cutting into uniform fry shapes.
- A baking sheet with parchment or a silicone baking mat
- OR an air fryer if you choose to go that route
Step By Step Instructions
For the full printable recipe, scroll to the recipe card at the bottom of the page.
How To Cut Butternut Squash

- Start by peeling the squash. Use a big, sharp knife to cut the very top and very bottom off of the squash so that you have two flat ends. Then use you knife to cut the skin from the squash going all the way around. I find this easier than using a peeler, but if you'd rather use a strong peeler, go for it.
- Cut the squash in half crosswise to separate the rounded end (with the seeds) from the straight top end. Then cut the bottom (round) half in half lengthwise to reveal the seeds. Scoop out the seeds with a spoon. Discard them or save them for roasting.
- Cut the squash into uniform sticks, about ½ inch thick by cutting half inch slices vertically, then cutting each slice into sticks. The rounded end won't give you nice, even sticks like the straight end, but just do the best you can!
How to Make Butternut Squash Fries
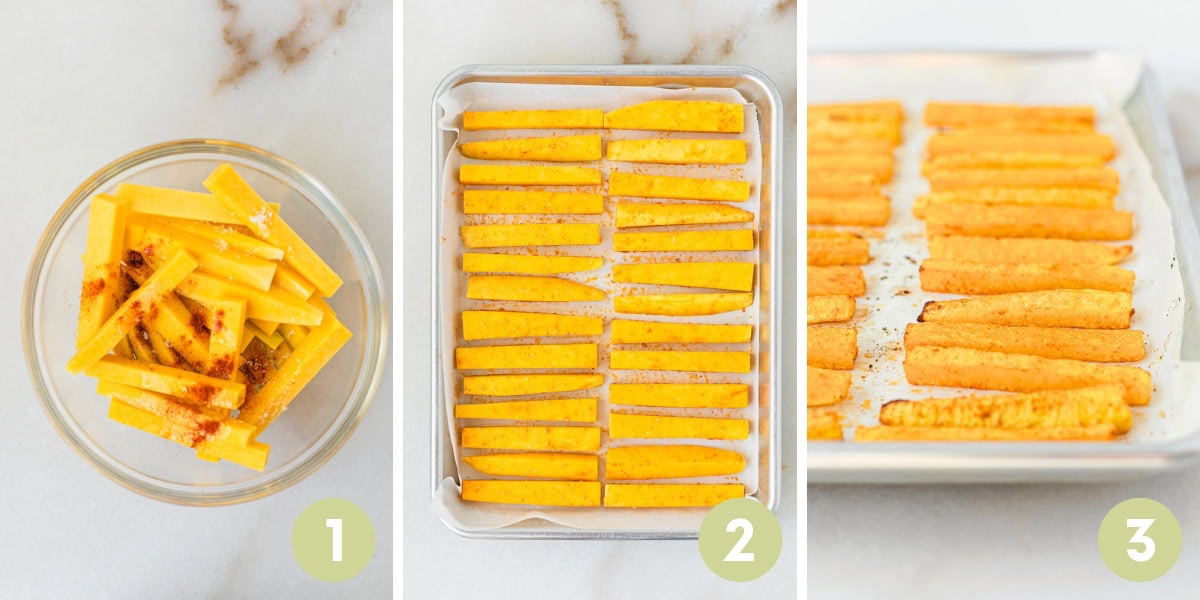
- In a large bowl, toss the squash sticks with the oil and seasonings.
- Spread onto a lined baking sheet in a single layer, leaving a little bit of space between each so that they roast, not steam.
- Roast at 400°F for , flipping halfway through.
Air Fryer Instructions
- Decrease the oil to 2 teaspoons. Follow the same steps above, but instead of spreading on a baking sheet, spread the fries evenly in the basket of your air fryer. You'll probably need to do 2-3 batches.
- Air fry ½-inch thick fries at 380°F for 25-30 minutes, giving the basket a shake every 5-10 minutes.
- For ¼-inch thick fries, reduce the cooking time to 15-20 minutes.
Tips For The Best Butternut Squash Fries
- Try to cut the butternut squash into as uniform pieces as possible so that they cook evenly. If they are all different thickness, some will burn while others don't cook enough.
- Make sure to leave a little space between each fry on the baking sheet so that they roast and get nice caramelized edges. If they're too crowded, they'll steam and be mushy.
- You can mix up the spices however you'd like. I love rosemary and parmesan, or try cinnamon and nutmeg for a more sweet-leaning fry.
Storage and Reheating
Store leftovers in an airtight container in the refrigerator for up to 4 days. My favorite way to reheat butternut squash fries is in the air fryer so that they regain their crispy edges again. I pop them in at about 300°F for a few minutes, them toss the basket and stick them back in for a few more minutes. You can also reheat them on a baking sheet in the oven at 400°F until warmed through, tossing once or twice.
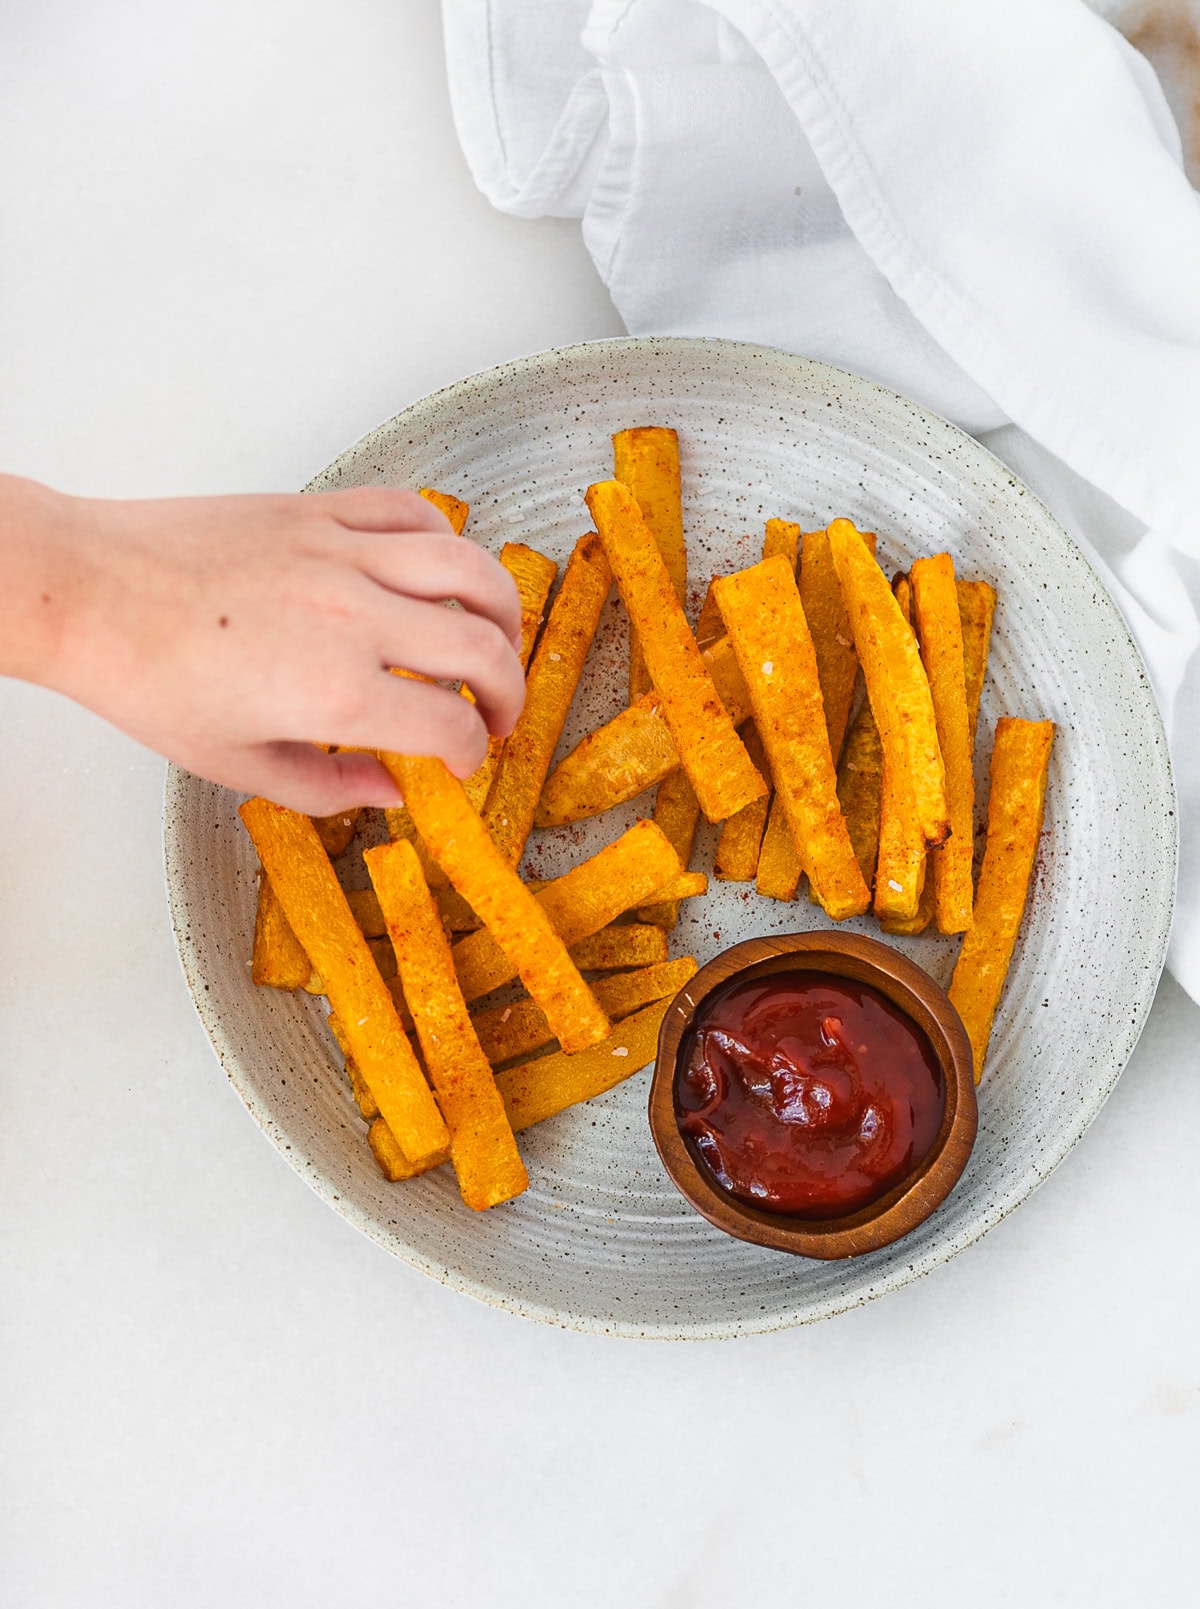
How To Serve Butternut Squash Fries To Babies 6 Months and Up
Butternut squash fries are the perfect shape for baby led weaning babies 6 months and up, and for babies in the finger food stage. Leave them as sticks and let baby scoop them up and go to town. You may choose to leave off the salt for little ones younger than 12 months, though I think a little is fine if you make most meals from scratch at home. I would also avoid ketchup for babies younger than 12 months due to the sugar, but for older kids ketchup or another favorite dipping sauce is fine.

Track your baby's journey through starting solids! Get my 100 First Foods Checklist and Allergen Checklist Bundle today!
Easy Baked Butternut Squash Fries Recipe
Easy baked butternut squash fries are a delicious and nutritious alternative to french fries. The shape and texture are ideal for baby led weaning, but they're also great for toddlers and kids of all ages! Includes oven and air fryer instructions.
- Prep Time: 10 minutes
- Cook Time: 35 minutes
- Total Time: 45 minutes
- Yield: 3-4 servings 1x
- Category: Side Dish
- Method: baked
- Cuisine: American
Ingredients
- 1 lb butternut squash, or 1 small squash
- 1 tbsp avocado oil or other neutral oil
- ½ tsp garlic powder
- ½ tsp smoked paprika
- ¼ tsp salt (optional)
Instructions
- Preheat the oven to 400°F. Line a large rimmed baking sheet with parchment or a silicone baking mat.
- With a sharp knife, peel butternut squash and cut into ½ inch thick sticks. (See post above for detailed instructions on peeling and cutting butternut squash.)
- In a large bowl, toss butternut squash sticks with oil, garlic powder, paprika, and salt, if using, until evenly coated. Spread onto the prepared baking sheet in a single layer, leaving a little space between each stick.
- Bake for 35-40 minutes, flipping fries halfway through, until soft and caramelized on the edges.
- Optional: Broil for 1-2 minutes at the end for crispier fries.
Air Fryer Instructions
- Decrease the oil to 2 teaspoons. Follow the same steps above, but instead of spreading on a baking sheet, spread the fries evenly in the basket of your air fryer. You'll probably need to do 2-3 batches.
- Air fry ½-inch thick fries at 380°F for 25-30 minutes, giving the basket a shake every 5-10 minutes.
- For ¼-inch thick fries, reduce the cooking time to 15-20 minutes.


Notes
- Store leftovers in the refrigerator in an airtight container for up to 4 days.
- Try to cut the butternut squash into as uniform pieces as possible so that they cook evenly. If they are all different thickness, some will burn while others don't cook enough.
- Make sure to leave a little space between each fry on the baking sheet so that they roast and get nice caramelized edges. If they're too crowded, they'll steam and be mushy.
- You can mix up the spices however you'd like. I love rosemary and parmesan, or try cinnamon and nutmeg for a more sweet-leaning fry.

Leave a Reply